
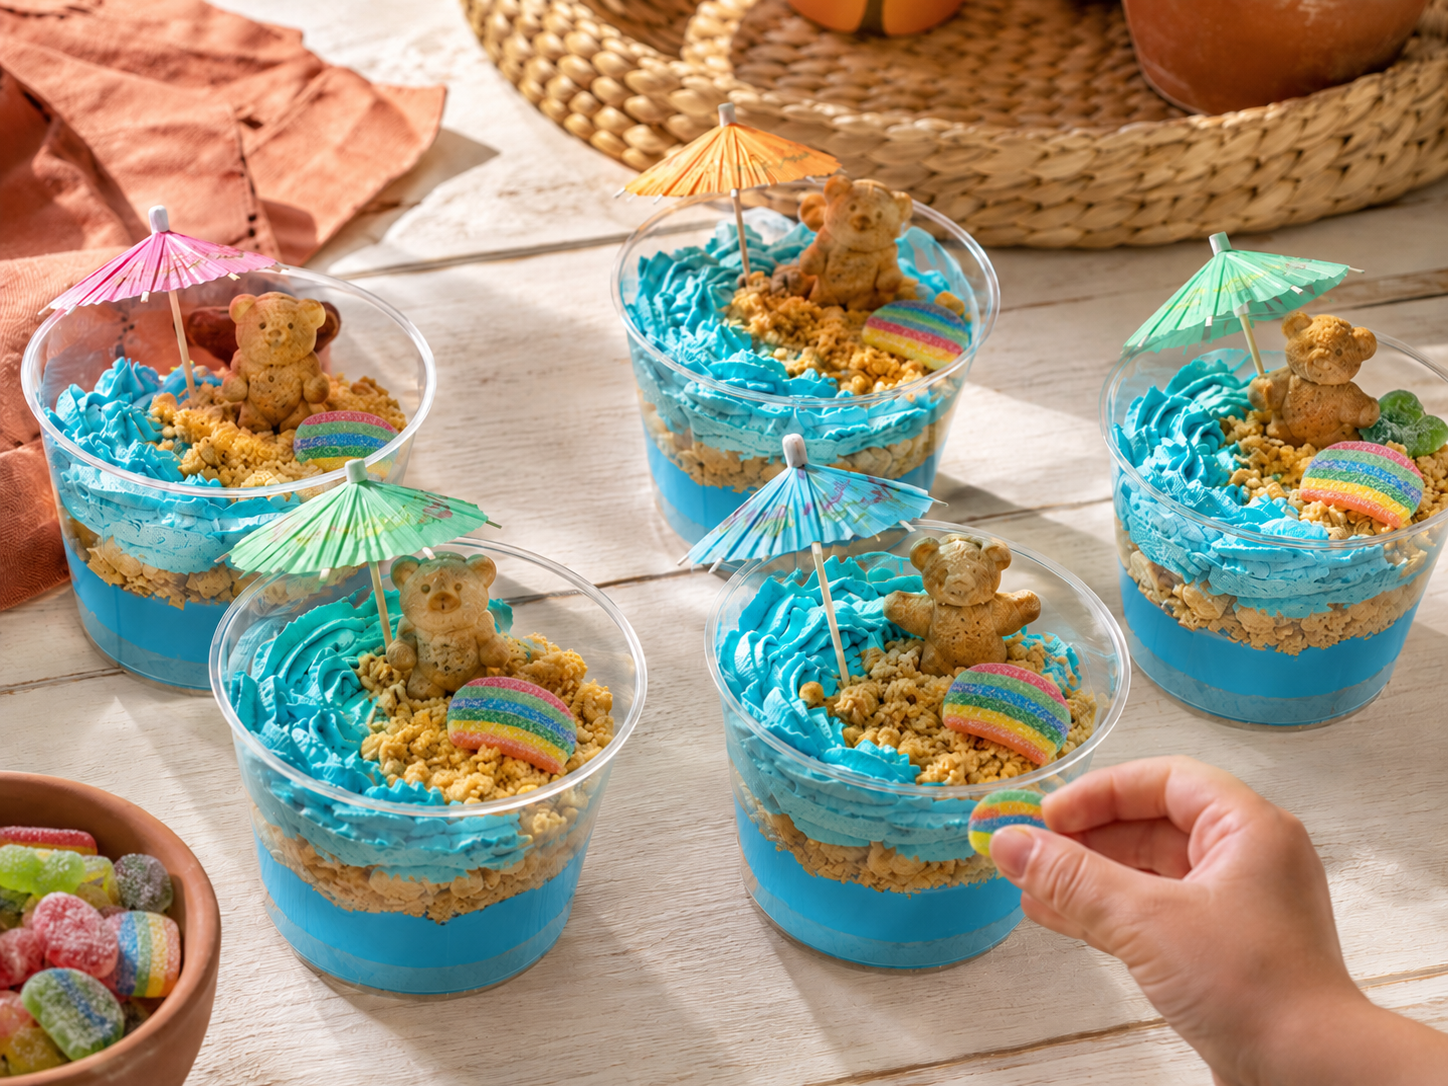
Beach Dirt Cups with Teddy Grahams (A No-Bake Summer Treat Kids Love)

You Might Also Love: Baking Cookies with Kids | Cookie Cutter Sandwiches | Backyard Picnic | Cereal Necklace Craft
This post contains affiliate links — see our disclosure.
It looks like a cup of sand with a tiny bear relaxing at the beach.
It tastes like pudding, Cool Whip, and graham crackers.
Kids absolutely lose their minds for it.
Beach dirt cups are one of those no-bake treats that hit the sweet spot: easy enough for a regular afternoon, impressive enough to feel special, and interactive enough to keep kids busy while making them. You make a snack and do a craft at the same time — and everyone eats when they’re done.
⏱ Setup Time: 10 minutes | 👶 Ages: 2+ with an adult | 🧹 Mess Level: Low–Medium | 💰 Cost: $
What You’ll Need
- Graham crackers or Nilla wafers (for the “sand”)
- White chocolate pudding mix + milk
- Cool Whip
- Blue food coloring
- Teddy Grahams
- Gummy Life Savers (inner tubes!)
- Clear plastic cups
🔗 Clear plastic cups, party pack
🔗 White chocolate pudding mix
🔗 Mini beach umbrella picks
🔗 Gummy Life Savers
Prep Notes
Make the pudding ahead of time. Mix white chocolate pudding with milk according to the package and refrigerate for at least one hour before building. Cold pudding layers better and holds its shape.
Before building:
Set up your assembly station with each ingredient in its own small bowl
Stir blue food coloring into your Cool Whip until it looks like ocean water (start with a few drops, add more to taste)
Crush graham crackers into a bowl — put them in a zip-lock bag and let kids smash with their hands or a rolling pin
Set up your assembly station with each ingredient in its own small bowl

How to Build the Beach Cups
Layer 1 — Deep Water
Spoon white chocolate pudding into the bottom of each clear cup, about one-third full.
Layer 2 — The Ocean
Spoon blue Cool Whip on top of the pudding. This is your ocean surface.

Layer 3 — The Sand
Sprinkle crushed graham crackers generously on top. Press down lightly.
Layer 4 — The Tourists
Slide a Gummy Life Saver onto a Teddy Graham’s arm — or prop it against the Life Saver — and place your bear at the beach.
Layer 5 — Accessories
Add a mini umbrella pick. Or a cracker “sandcastle.” Or a Swedish Fish swimming in the ocean layer. Let kids decorate however they want.

Kid Jobs & Adult Tips
| 👶 Kid Jobs | 💡 Adult Tips |
|---|---|
| Crushing the graham crackers (extremely satisfying) | Pre-color the Cool Whip before setup — if kids add food coloring themselves, it gets competitive and messy fast |
| Scooping each layer | Use clear cups only — the layering effect is half the magic |
| Placing the Teddy Graham and Life Saver | Chill for 15 minutes after building if you can wait — firms everything up beautifully |
| All decoration decisions | Grandma tip: photograph the finished cups before anyone eats them — kids want to see the photo later, and so do you |
Creative Variations
Dirt and worms (fall version): Chocolate pudding + crushed Oreos + gummy worms. Same concept, autumn vibes.
Ocean cups: Blue Jell-O base + clear gelatin top + Swedish Fish suspended throughout.
Tropical version: Swap graham crackers for coconut flakes as the “sand” + a pineapple piece on top.
Birthday party version: Set up the assembly station and let each guest build their own cup as the party activity. They eat their creation — no extra craft cleanup needed.
💛 Memory-Making Prompt
While everyone’s eating, ask: “If you could spend a whole day at the real beach, what would you do first? What would you bring?”
Let them describe their dream beach day in full, glorious detail. Some kids will have real beach memories. Some will build an entirely imaginary beach from scratch. Both conversations are wonderful.
Frequently Asked Questions
What are beach dirt cups made of?
Beach dirt cups are made of layers: white chocolate pudding on the bottom, blue-colored Cool Whip for the ocean, crushed graham crackers for the sand, and Teddy Grahams as the beachgoers. Optional add-ons include Gummy Life Savers (inner tubes), Swedish Fish, and mini umbrella picks.
Do beach dirt cups need to be refrigerated?
Yes. Make the pudding at least an hour ahead and refrigerate until firm. Assembled beach dirt cups can be refrigerated for up to 24 hours before serving. For best results, add the graham cracker sand layer right before serving so it doesn’t get soggy.
Can you make beach dirt cups ahead of time?
You can prep the layers (pudding, colored Cool Whip, crushed graham crackers) up to a day ahead and store separately. Assemble the cups a few hours before serving and refrigerate. Add the Teddy Grahams and decorations right before eating.
What can I substitute for Cool Whip in beach dirt cups?
Homemade whipped cream works as a Cool Whip substitute — whip heavy cream with a little powdered sugar until stiff peaks form, then mix in blue food coloring. The consistency is slightly lighter but holds its shape well when chilled.
📌 Save This for Later!
Pin this post so you have it ready for summer afternoons, parties, or anytime you need a fast win.
🎁 Want 9 More Ideas Like This?
Download the free Connecting with Your Kids Starter Guide — 10 simple activities with supply lists and step-by-step instructions for every age.
Follow along at @doublebatchlife on Instagram — simple, affordable activity ideas every week.
Written by Double Batch | doublebatchlife.com | Last updated: June 2026
3 Comments
Comments are closed.